
SpringBoot Microservices using PCF Tiles SCS and Single Sign-On
- How to use Spring Cloud Services?
- How to use Single Sing-On tile in PCF?
- How to use Service-to-Service App?
OAuth 2.0 Actors
- Application: A client that makes protected requests using the authorization of the resource owner.
- Authorization Server: The Single Sign-On server that issues access tokens to client applications after successfully authenticating the resource owner.
- Resource Server: The server that hosts protected resources and accepts and responds to protected resource requests using access tokens. Applications access the server through APIs.
Pre-requisite
- First, create the Single Sing-On service from the Marketplace
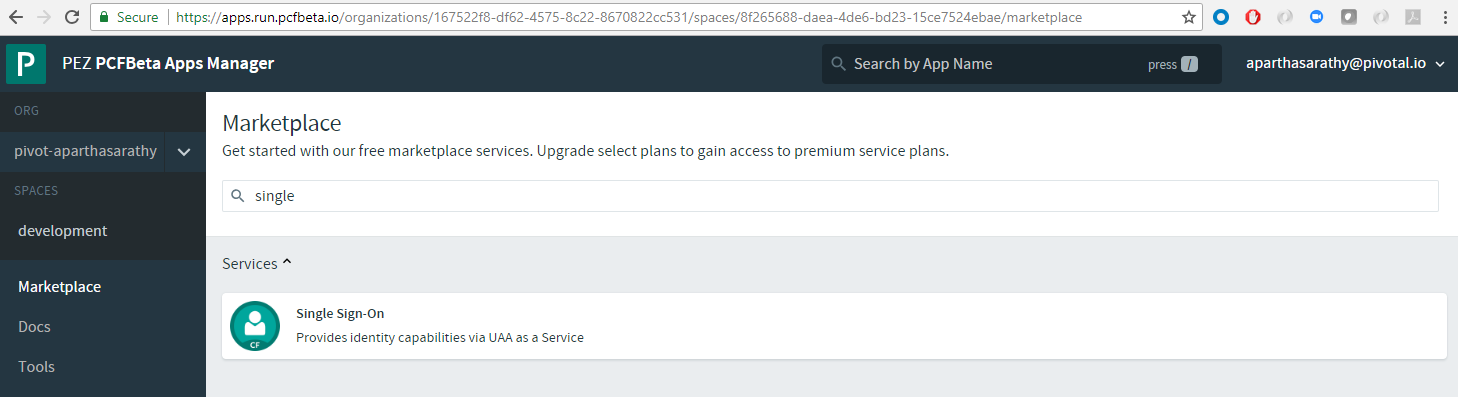 . Go with the default options and create the service
 - From the
cf cliyou can grab the URL for this newly created service as follows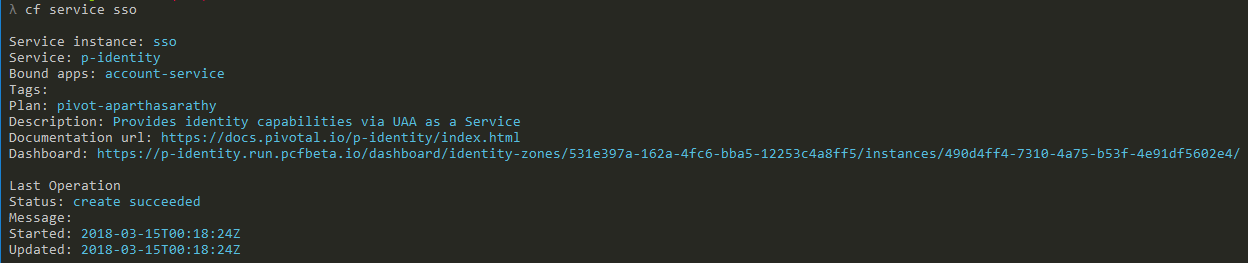
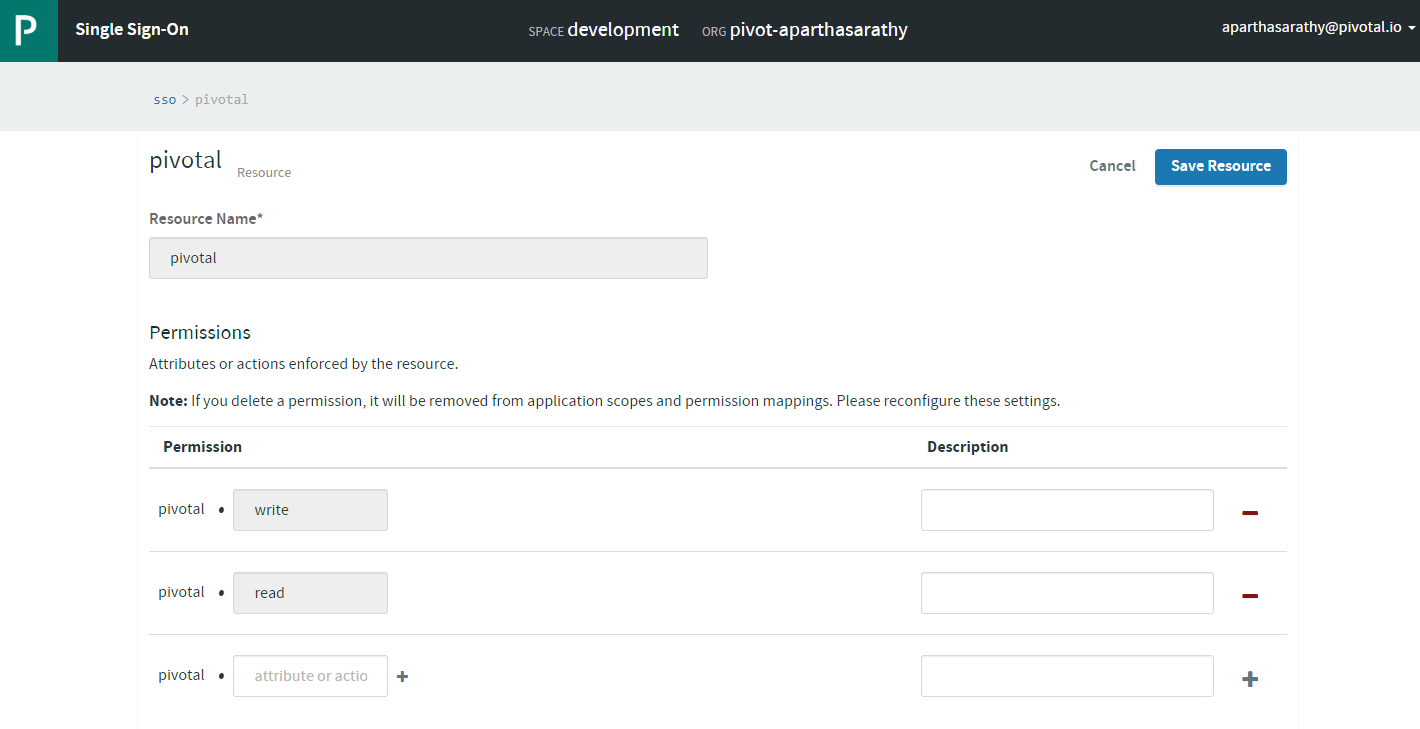
- When you come in for the first time to the above URL, there will be no Apps or Resources
- Now, let’s create resources
- After resources, let’s create a Service-to-Service App. Ensure to select the pivotal resources (or the resource created in the above step 4.)
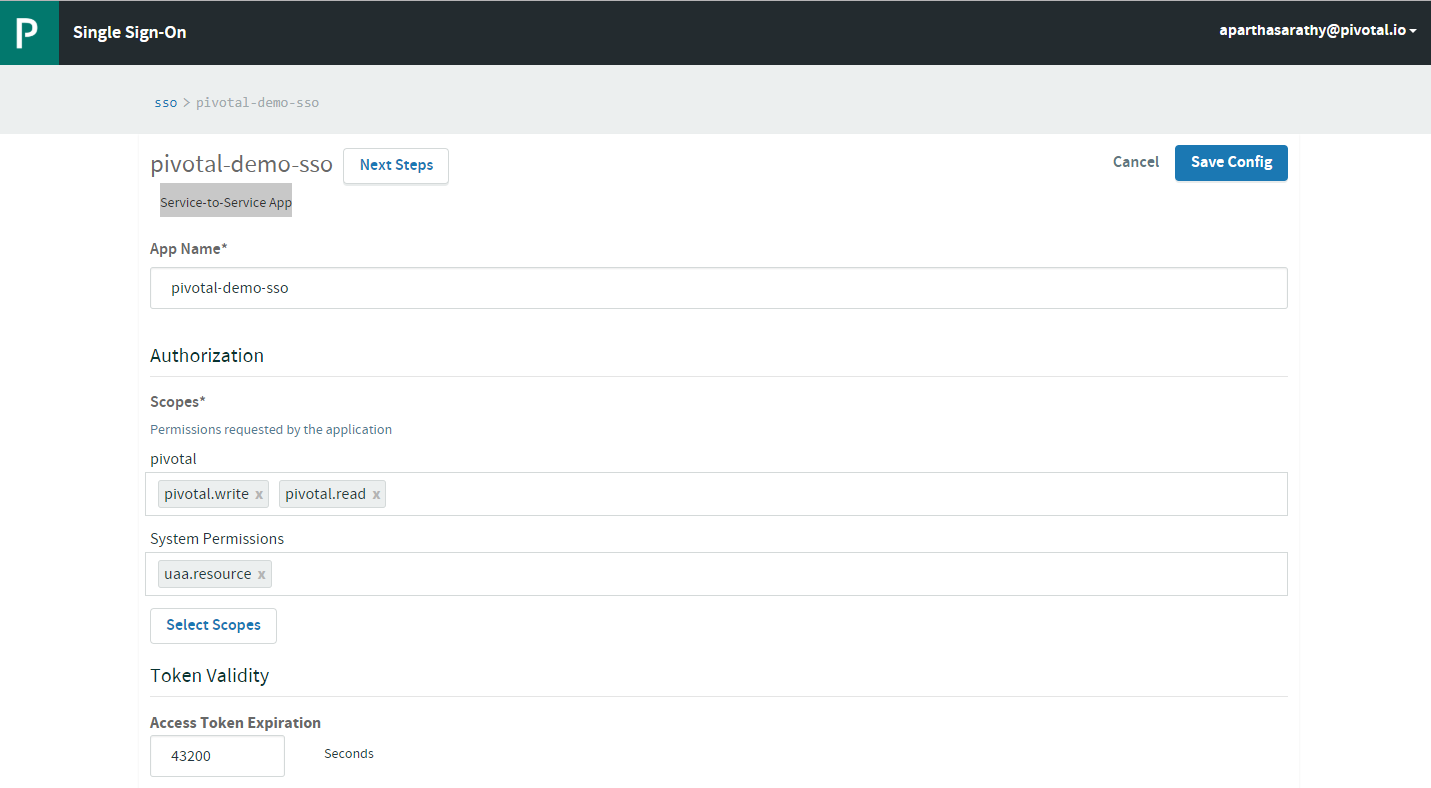 Note: Download the
 App IDandApp Secretlocally as you can copy it only the first time. Next time, you will be able to re-generate newApp Secret. Copy the OAuth Token URL as well.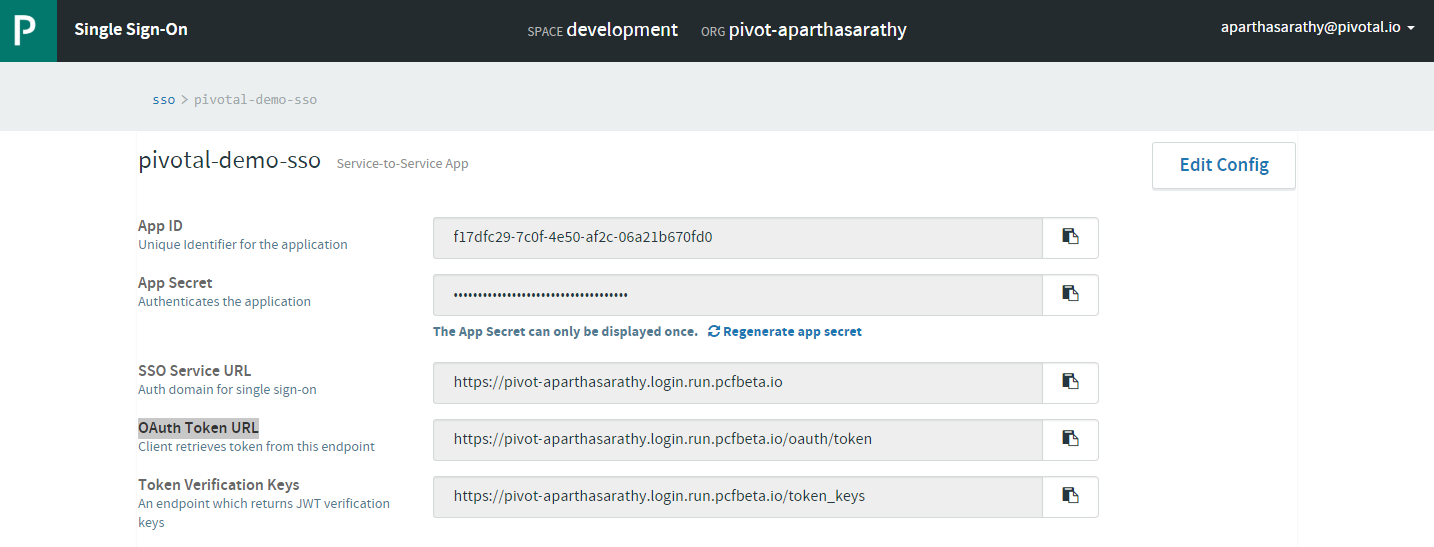
Scenario 1: Not using SSO Tile in PCF
-
In this scenario, we do not bind the customer-service to the PCF SSO Tile. Rather, we only configure the following properties in the application.yml and secure the micro-service
AUTH_SERVER: https://pivot-aparthasarathy.login.run.pcfbeta.io/ security: oauth2: resource: preferTokenInfo: false userInfoUri: ${AUTH_SERVER}/userinfo tokenInfoUri: ${AUTH_SERVER}/check_token jwk: key-set-uri: ${AUTH_SERVER}/token_keys -
In our java code below, we make use of EnableResourceServer as well as, set a resourceId explicitily. This ensures that, apart from checking the validity of the JWT Token, we also require the token to have the required scope.
@Configuration @Profile({"sso"}) @EnableResourceServer public class AuthConfig { @Value("${ssoScope:pivotal}") private String ssoResourceId; @Bean public GlobalMethodSecurityConfiguration globalMethodSecurityConfiguration() { return new GlobalMethodSecurityConfiguration() { @Override protected MethodSecurityExpressionHandler createExpressionHandler() { return new OAuth2MethodSecurityExpressionHandler(); } }; } @Bean public RequestInterceptor requestInterceptor(){ return new RequestInterceptor() { @Override public void apply(RequestTemplate requestTemplate) { OAuth2AuthenticationDetails details = (OAuth2AuthenticationDetails) SecurityContextHolder.getContext().getAuthentication().getDetails(); requestTemplate.header("Authorization", "bearer " + details.getTokenValue()); } }; } @Bean public ResourceServerConfigurer resourceServerConfigurerAdapter() { return new ResourceServerConfigurerAdapter() { @Override public void configure(ResourceServerSecurityConfigurer resources) throws Exception { resources.resourceId(ssoResourceId); } @Override public void configure(HttpSecurity http) throws Exception { http.addFilterAfter(new OncePerRequestFilter() { @Override protected void doFilterInternal(HttpServletRequest request, HttpServletResponse response, FilterChain filterChain) throws ServletException, IOException { filterChain.doFilter(request, response); } }, AbstractPreAuthenticatedProcessingFilter.class); http.csrf().disable(); http.authorizeRequests().anyRequest().authenticated(); } }; } - With this our app should be secured. If we invoke an API without valid token, you should see 401 Unauthorized response from the app.
-
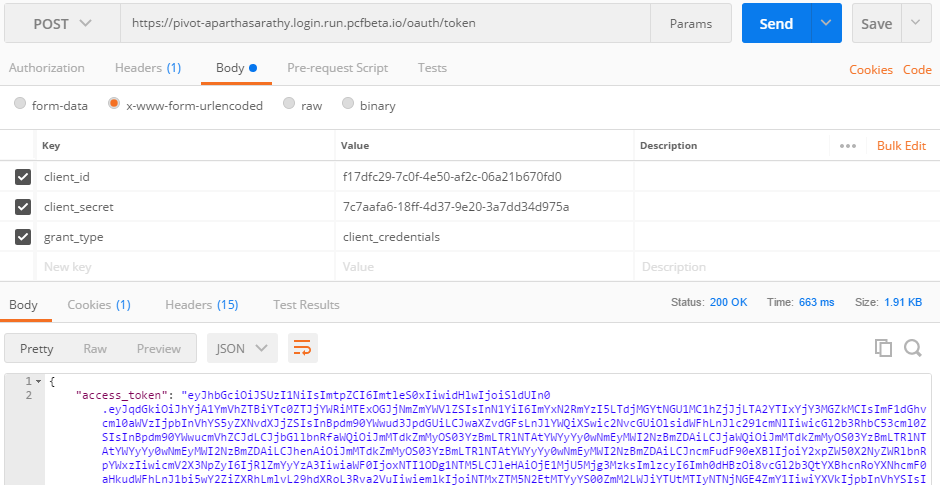
First let’s generate the token Ensure jq is installed.
curl -s -X POST https://pivot-aparthasarathy.login.run.pcfbeta.io/oauth/token -H "Content-Type: application/x-www-form-urlencoded" -d "client_id=f17dfc29-7c0f-4e50-af2c-06a21b670fd0&client_secret=7c7aafa6-18ff-4d37-9e20-3a7dd34d975a&grant_type=client_credentials" | jq -r .access_token - If you don’t have jq, you can use Postman
- Pass this access_token in the Header when invoking
/customersAPI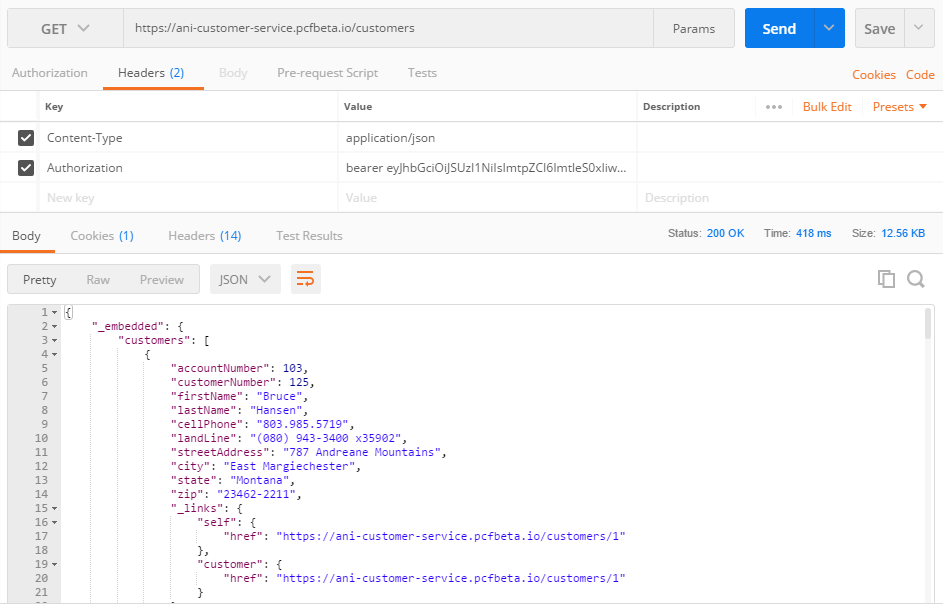
-
If you pass a token without pivotal resource id, you would receive a 403 Forbidden with a body
 {
     "error": "access_denied",
     "error_description": "Invalid token does not contain resource id (pivotal)"
 }
Scenario 2: Using SSO Tile in PCF
-
In this scenario, we will bind the account-service to the PCF SSO Tile. There is nothing related to security.oauth2 properties in the application.yml rather, those properties get injected through VCAP as we bind to the sso service in the manifest.yml
--- applications: - name: account-service memory: 1024M path: ../../../build/libs/account-service-0.0.1-SNAPSHOT.jar host: ani-account-service instances: 1 services: - config - registry - sso env: SPRING_PROFILES_ACTIVE: sso GRANT_TYPE: client_credentials SSO_SCOPES: pivotal.write, pivotal.read, spring.write, spring.read SSO_AUTHORITIES: pivotal.write, pivotal.read, spring.write, spring.read SSO_ACCESS_TOKEN_LIFETIME: 30 - In our java code below, we make use of EnableResourceServer. Please refer
customer-servicejava code above for this. - Once we generate the token (refer to
customer-servicesection above), we could invoke any REST API and validate the same.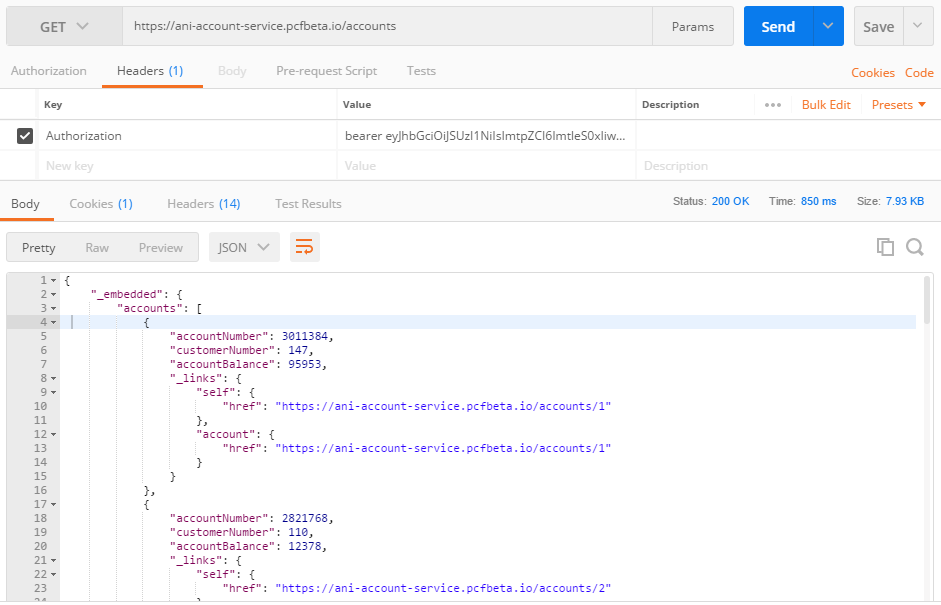
Scenario 3: 3rd Party micro-service to call above secured micro-services
Let’s say we have another micro-service bff-service which calls both account-service and customer-service. To make it even more interesting, we could have 2 cases
- Case 1:
bff-serviceauthorization token cannot be re-used because it doesn’t have the required scope to call other microservices - Case 2:
bff-serviceis secured by some other type of security (for e.g. ACL based security)
In both the above cases, we need to generate a token through the application, embed that in the HttpHeader before making a RESTTemplate call. In this example, I have used Ribbon with Eureka to invoke the call to ther microservices registered with Eureke
-
First generate accessToken inside the code. This requires a valid client_id and client_secret. This is where we would use the values configured in the Pre-requisite section above.
@Service @Slf4j public class TokenService { @Autowired RestTemplate restTemplate; /** * Get Access Token * @return TokenInfo */ public TokenInfo getAccessToken() { log.info("Came inside getAccessToken()"); HttpHeaders headers = getHeaders(); MultiValueMap<String, String> map = new LinkedMultiValueMap<String, String>(); map.add("client_id", oAuth2ClientConfig.getClientId()); map.add("client_secret", oAuth2ClientConfig.getClientSecret()); map.add("grant_type", oAuth2ClientConfig.getGrantType()); HttpEntity<MultiValueMap<String, String>> request = new HttpEntity<MultiValueMap<String, String>>(map, headers); ResponseEntity<TokenInfo> tokenInfoResponseEntity = restTemplate.postForEntity( oAuth2ClientConfig.getAccessTokenUri(), request, TokenInfo.class); if (Objects.nonNull(tokenInfoResponseEntity)) { return tokenInfoResponseEntity.getBody(); } else { log.error("No Access Token"); return null; } } private HttpHeaders getHeaders() { HttpHeaders headers = new HttpHeaders(); headers.setContentType(MediaType.APPLICATION_FORM_URLENCODED); return headers; } -
Using the above method, we can use this generated token while RESTTemplate calls to other microservices
@Service @Slf4j public class BFFService { @Autowired private RestTemplate restTemplate; @Autowired private TokenService tokenService; @Value("${CUSTOMER_SERVICE_URL}") private String URL_CUSTOMER_SERVICE; @Value("${ACCOUNT_SERVICE_URL}") private String URL_ACCOUNT_SERVICE; /** * BackEnd For Front-End method to aggregate data from 2 micro-services * @param customerNumber * @return */ public UIResponse findCustomerDetailsByNumber(int customerNumber) { log.info("Came inside findCustomerDetailsByNumber for customerId: " + customerNumber); StopWatch stopWatch = new StopWatch(); stopWatch.start(); UIResponse uiResponse = null; log.info("Querying the customer microservice..."); HttpHeaders httpHeaders = tokenService.getHeadersWithAccessToken(); HttpEntity<String> entity = new HttpEntity<String>("parameters", httpHeaders); String uri = URL_CUSTOMER_SERVICE + customerNumber; log.info("Calling URI: " + uri); ResponseEntity<Customer> customerResponseEntity = restTemplate.exchange( uri, HttpMethod.GET, entity, Customer.class); stopWatch.stop(); if (Objects.nonNull(customerResponseEntity)) { Customer customer = customerResponseEntity.getBody(); log.info("customer micro-service took " + stopWatch.getTotalTimeMillis() + " milliseconds"); log.info("customer micro-service returned " + customer.toString()); uiResponse = new UIResponse(customer.getFirstName(), customer.getLastName(), customer.getAccountNumber()); uiResponse.setContact(new Contact(customer.getCellPhone(), customer.getLandLine(), customer.getStreetAddress(), customer.getCity(), customer.getState(), customer.getZip())); //Now make Account service call stopWatch = new StopWatch(); stopWatch.start(); uri = URL_ACCOUNT_SERVICE + customerNumber; log.info("Calling URI: " + uri); ResponseEntity<List<Account>> accountResponseEntity = restTemplate.exchange( uri, HttpMethod.GET, entity, new ParameterizedTypeReference<List<Account>>() {}); stopWatch.stop(); log.info("account micro-service took " + stopWatch.getTotalTimeMillis() + " milliseconds"); if (Objects.nonNull(accountResponseEntity)) { List<Account> accounts = accountResponseEntity.getBody(); log.info("account micro-service returned " + accounts.toString()); uiResponse.setAccounts(accounts); } } return uiResponse; } -
Of-course the above client could also be done in a simpler way using OAuth2RestTemplate. Create the required bean
@Bean public DefaultOAuth2ClientContext oauth2ClientContext() { return new DefaultOAuth2ClientContext(new DefaultAccessTokenRequest()); } @Autowired OAuth2ClientConfig auth2ClientConfig; @Bean public ClientCredentialsResourceDetails client() { ClientCredentialsResourceDetails resourceDetails = new ClientCredentialsResourceDetails(); resourceDetails.setClientId(auth2ClientConfig.getClientId()); resourceDetails.setClientSecret(auth2ClientConfig.getClientSecret()); resourceDetails.setAccessTokenUri(auth2ClientConfig.getAccessTokenUri()); resourceDetails.setGrantType(auth2ClientConfig.getGrantType()); return resourceDetails; } @Bean public OAuth2RestTemplate oAuth2RestTemplate() { return new OAuth2RestTemplate(client(), oauth2ClientContext()); } -
Use the above OAuth2RestTemplate in the service class. In this way, the template will automatically generate the accessToken (if not already present)
 @Autowired
 private OAuth2RestTemplate oAuth2RestTemplate;

 public UIResponse findCustomerDetailsByNumberUsingOAuth(int customerNumber) {
     ...
     ResponseEntity<Customer> customerResponseEntity = oAuth2RestTemplate.getForEntity(
             URL_CUSTOMER_SERVICE, Customer.class, customerNumber);
     ...
     ResponseEntity<List<Account>> accountResponseEntity = oAuth2RestTemplate.exchange(
             URL_ACCOUNT_SERVICE, HttpMethod.GET, null,
             new ParameterizedTypeReference<List<Account>>() {}, customerNumber);
     ...
 }